 |
 |
|
|
N2O Input Side
|
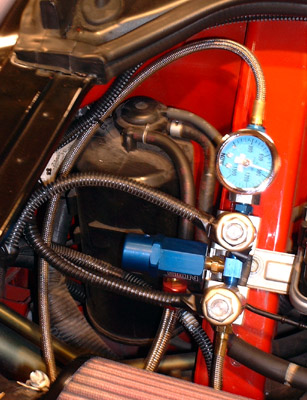
Fuel Pressure Safety Switch
|
This was a tough install, mostly because of the steering wheel/wiring changes I had to make and the sometimes sketchy instructions, but the results were great - 315hp at the wheels. The instruction could have been a little more clear, shown schematics and more pictures. Many people have installed this kit with no questions or problems, but I'm just too damned literal of a guy, so spell it out for me as if I haven't ever done this install before–which I haven't.
- Switches installed, note the lack of labels! #1 is bottle open/close (up/down), #2 is N2O/horn left steering wheel button selector, #3 is master on/off.
I guess it's just me, but there should have been a few warnings like, "When drilling the hole for the wiring behind the ashtray, beware the metal bracket that will be in your way and cause the drill bit to jump to the left, destroying everything in it's path." Yup, that would have been good. So would, "Be careful while drilling the nitrous bottle mounting holes in the trunk, as the frame rails are right where you will be drilling, and hitting the edge of one with a drill bit causes it to jump and rips a 3/4" gash in the micro thin aluminum of the trunk floor." That would have been good as well.

- Minnkota trolling motor slide bracket bolted through floor.
- Note quick disconnects on all wiring to bottle opener for easy removal.
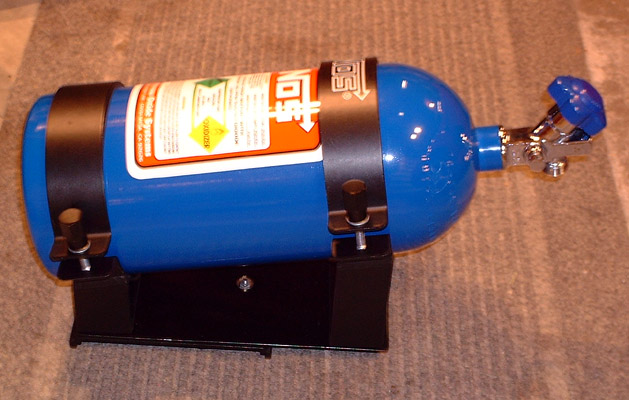
The 1/2" rubber expansion nuts provided would never hold the bottle in the event of an accident, so the best mounting method is using a piece of bar stock and sandwiching the aluminum from the bottom. This of course requires removal of the exhaust and trunk heat shield to accomplish. Got a spare 4 hours?
- Top half of Minnkota mount with second aluminum plate bolted in place and aluminum quick release bottle brackets.
- Be sure to space the brackets far enough apart to clear a bottle warmer pad in case you want to add one later.
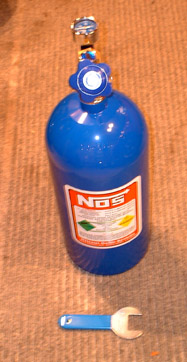
I didn't like the plastic bottle brackets that came with the kit, so I called Summit and ordered the aluminum quick release brackets, a bottle wrench and a second 10# bottle (which came with a free bottle blanket!).
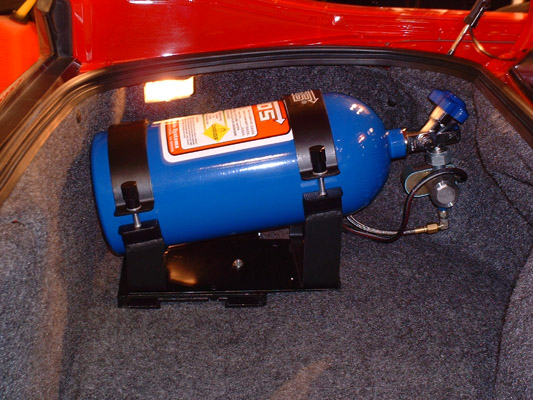
Complete assembly in trunk, clearance is no problem and it looks great!
I went one better than mounting the brackets to the trunk floor directly and went to the local bait shop and picked up a genuine Minnkota trolling motor slide bracket, bolted the base to the trunk floor, made up an aluminum plate to mount the bottle brackets to and put push-in connectors on the remote bottle opener electrical connections. Now I can remove the whole bottle assembly, leaving only the flat floor mount and have all my truck space back, critical for those two golf bag outings with my business partner.
 |
 |
|
|
Spare N2O bottle
|
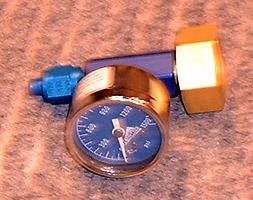
Pressure gauge bottle sealer
|
So I go to get the bottles filled over at TNT Motorsports in Blaine, MN. I pull up to find another red NSX in the lot! This one was bone stock though. While I'm waiting for the fill up I pick up a few spare crush seal washers for the bottle opener and the stuff to make a screw on bottle pressure gauge. It could also double as a bottle sealer, not letting precious N2O leak out should the valve be opened. A few bucks later I'm out the door. I no sooner get the bottles home when I step passed one of the bottles and open the valve with my shoe! There goes about a half pound of the good stuff! I immediately put my little gauge together, screw it on the bottle and now I don't have to worry if the valve is open or not!
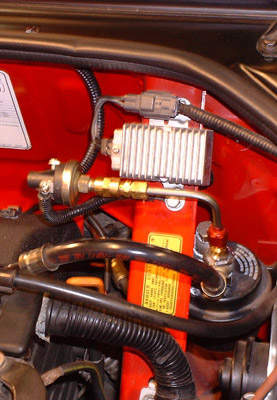
Once the wiring was complete, I used the black split case wiring cover to go over everything. I really should get the "T" adapters to do junctions instead of doing the old black tape trick. One thing that worked great was routing the casing around the blue lead that goes from the fuel pressure switch (shown at top of page) to the solenoid under the edge of the engine cover seal. Pull the seal towards the back of the car and it will come off, put small black wire ties around the wire cover and leave the tails stick out and pointing up. Put the tails between the seal and aluminum edge and push the seal back on. The wire loom tucks itself up and under the edge of the seal and it's done! No screws, no dicking around. Easy.
I had also called Randy at RM and got his recommendation for different spark plugs for best N2O performance: NGK BKR7E-11. These are one heat range colder than stock (stock are 6, these are 7 on a scale of 2 being the hottest and 11 being the coldest). Rule of thumb is 1 heat range cooler for each 75-100hp of increase via forced induction (turbo, supercharger or N2O).
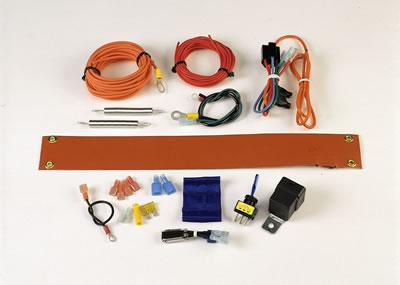
N2O BOTTLE HEATER KIT: PN 14164, $115
So I finally installed the bottle heater and I have no idea why I waited so long! Now the pressure stays at 900psi all the time like it should with no dicking around. The install took about 2 1/2hrs and was mostly just getting the science of what was going where worked out. The kit comes with everything you need, wire, crimp on connectors, switch, relay and fuse. The diagram was easy to follow and left no questions (THAT's a first!)
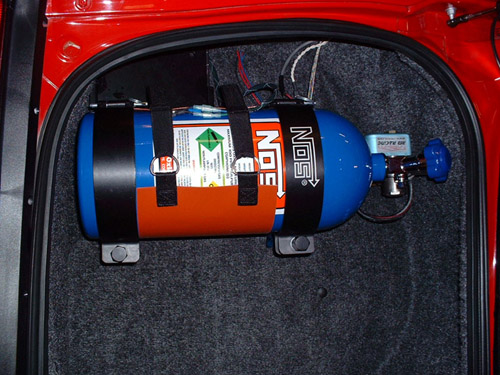
Bottle installation with heater. Note temp sensors under left strap, wiring under right strap.
I took out the bottle, easy because of the slide rail mount, and then pulled the left trunk lining panel. I took a wire tie and attached the relay socket high on the antenna housing tube so it's solid. Instead of mounting the ON/OFF switch in the cabin, I put it right on the bottle bracket as I need to be in the trunk to turn on the bottle anyway. This saved a ton of time by not having to route wires into the interior.

N2O Bottle Heater Switch mounted on bottle bracket. Down is OFF for safety.
With all the wiring in the trunk other than power, I recalled from my extensive reading of the NSX Service Manual that the hot cable from the battery comes right to the fuse box in the engine bay. A few feet of wire and wire loom to make it pretty and a crimp on loop to attach it to the hot side bus is all it takes!
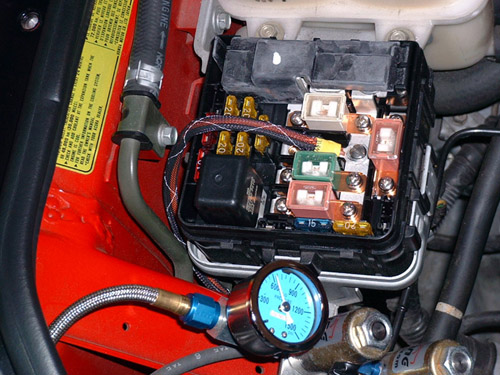
Wire connection to hot side of fuse block. Kit has 30amp fuse in line for safety.
Once completed, using the N2O is fabulous! I'm hooked big time. This is a great way to increase performance without going the supercharger route, but with the Basch unit available now, I may be moving up the food chain again.
NSXPO 2001 UPDATE: After using the juice for a year on the street and on the track at Brainerd and Road America, the only thing I can say is I need a bigger bottle. I used full bottle each day at the track, using it only on the straights. You want to talk about passing gear? My instructor Jerome Zimmerman from Realtime Racing wanted to know how the hell I could pass cars so easily at RA, and didn't notice me pushing the button until after a couple of sessions. That was fun...