
RM Racing Hood:
I love this hood!
This was kind of a tough one though. I ordered one of the first hoods that RM made, and waited for the thing for quite a while. I had it shipped right to my body shop, and it arrived in “interesting” condition; the top and bottom layers were separated along the front edge inside the hood and the sharp corners at the windshield were snapped off about 3/4 inch, most likely from shipping. The shop started repairing the hood thinking it was no big deal, I called Randy and he said to send it back. Sure, now that the body shop had done a Frankenstein on it. I wasn't happy with the “fixed” version so RM just sent another one. They didn't even want the old one back. It was a tough deal for RM and I had to wait for ever to get it right, but it finally it was done, and done perfectly. So this spring I had the car in for a bunch of upgrades, and the Acura dealer snapped off the drivers side tip about 2 inches in! I had my body guys fix it, but it didn't turn out perfect. I'm the only one that notices but it pisses me off. And after I told them to be careful with it...
The hood comes without the washer sprayer holes drilled, and I chose to not install them. I did buy new ones but never needed them, so they sit in a box. You also have to modify your prop rod to work, as the stock length and clip location interfere with the opening. I cut off the stock rod at 28", put a rubber cap on the end and stow it parallel to the radiator, tucked between the body and the fuse cover. Looks great, works great.
Getting the hood on the car is the easy part. Getting the headlight covers to line up and be flush is something else. I have about 4 hours into the driver side headlight and it looks pretty good. The passenger side one is low and too close to the fender. Also, there's a little twist to the front edge (you can see it in the pics) that holds the passenger side up just a bit. I can adjust that out as well by making the latch tighter, but that will make it harder to close. You know, I'll get around to it.
These aren't made any more, so you have to get a Japanese body kit hood or have Dali modify your factory hood.
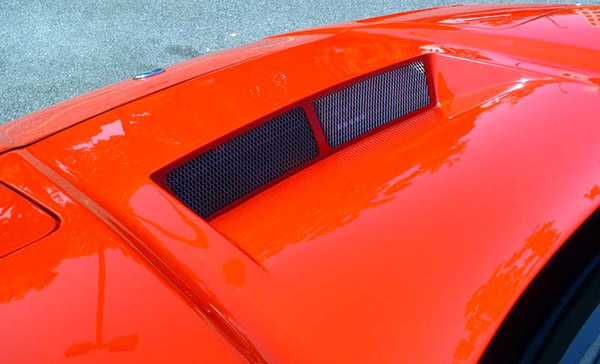
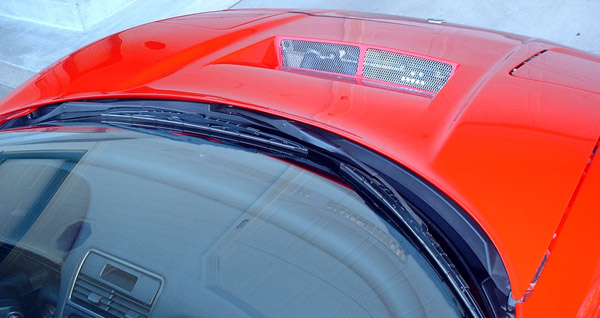
NEW! I added the same aluminum wire mesh as I put on the side air intakes in the openings of the hood. It turned out great! Once again, heavy-duty 3M double stick tape to the rescue! You could reattach a fender with this stuff. The inside looks ok, not perfect, but I think I can fabricate a surround that will clean up the edges. There are more pics in the Pictures area.