
To see the engine compartment oil temp and pressure gauge mounting, click here.
In the immortal words of Jon Hart, "You make me hot."
This refers, of course, to the temperature of my oil as I go faster for longer at the track. Last time out I watched my oil pressure gauge slowly drop under high RPM until it was flirting with zero. Yes, I said zero. That means my oil temp (which I don't have a gauge for) was somewhere OVER 300 degrees F. That's a lot.
Time to cool this baby down. A quick check of the Dali web site finds their new oil filter relocation kit $537.33, which gets all the oil lines right where I need them-up front (or so I thought).
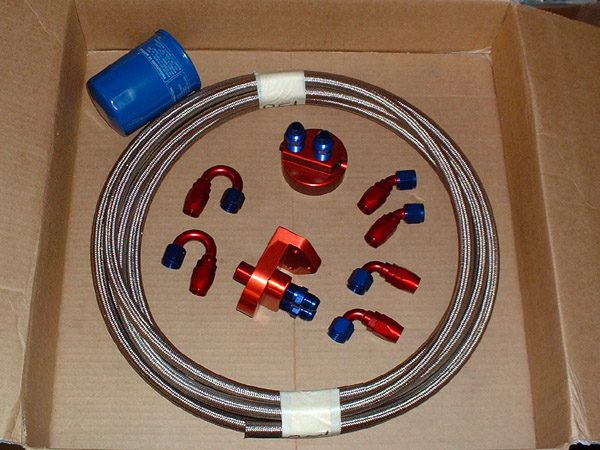
The kit comes with all the pieces you need to move the factory oil filter to the front of the car, and plumb in an oil cooler if so desired (and I do). It even comes with a new oil filter. Hey, where's the oil?
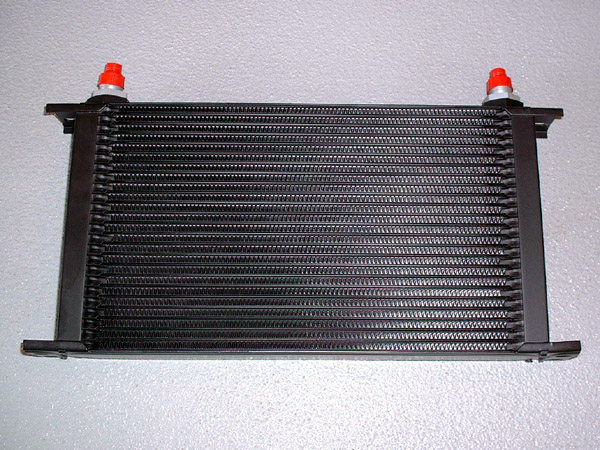
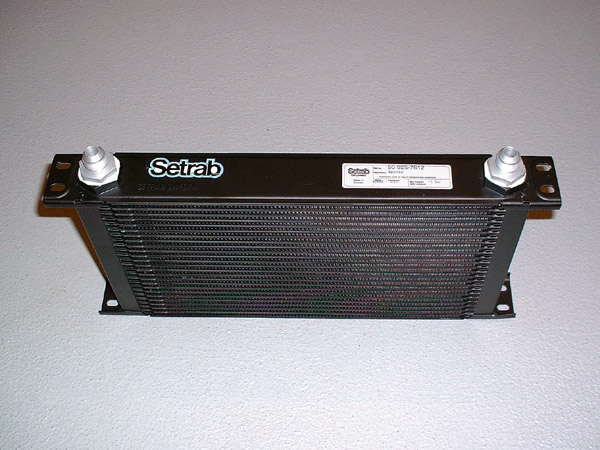
I didn't want to get a cheap oil cooler that could possibly let me down, so I got the best you can buy. The guys over at Baker Precision carry the Setrab oil coolers, which are standard equipment on Shelby Cobras. Good enough for me. I got the 925-8 unit, which measures 16w x 9h x 2d with #8 AN fittings for $200.
The cooler will mount at an angle in the space where the spare tire once stood. I'll fab up some brackets to hold it securely in place, leaving room for an electric fan if normal air flow alone doesn't do the trick.
Now for the fun part-mounting all this stuff! See the AC line just to the left of the coolant hose on the left? It sticks out about 1.25", and the oil filter will mount directly above it. So instead of bending the AC line inboard to gain clearance for the oil filter, we'll put in a spacer behind the remote filter mount. Having friends at a machine shop doesn't hurt.
![]()
So now to put the whole thing together!
July 3, 2002: Well I put the takeoff, remote filter mount, cooler and #8 lines in and Houston, we have a problem! 2+ days of sweating my ass off in 95+ degree weather JUST to find that the oil pressure of the motor went down by about 40%, probably due to restriction in the lines. Oh, and when the cylinder temperature goes up (like when I'm on the nitrous) the pressure promptly drops to zero. Nice.
So yesterday up at Brainerd Intl., I ran into Russell, the lead mechanic for Archer Racing. He took one look at the #8AN lines and told me that they ran #12 lines in the race Talons, and most road racers use bigger. OK, so now I'm having him modify the motor takeoff piece to accept #12 fittings, Mark @ Dali is taking back the rest of the "small" parts, and I'll be plumbing with big this time. The cooler can be updated with larger fittings easily. Archers suggested the Moroso big boy NASCAR oil filter mount.
More to come after I get this all put together. Round 2, Ding!
Jun, Jul, Aug, Sep, Oct 2002: Oh the fun I've had the past few months! Lets just do a quick synopsis:
1) As the oil pressure (indicated on the dash gauge) was telling me I had no oil pressure at high RPM, I was a little concerned.
2) Thinking it was the oil getting hot (MJ@Dali's idea) I added many hours and dollars to add an oil cooler w/#8 AN lines.
2a) Having far less indicated pressure and the same problem with the pressure at RPM, I went with #12 AN lines, spending more cash and redoing everything. As a side benefit, I now have a little oil leak at the pipe thread fitting on the oil return line from the front of the car and I can't tighten it enough to stop it from leaking.
3) Indicated pressure back to "stock" levels - until high RPM, then right back to the old problem. Nice.
4) Research with Dali, Basch, RealTime Racing, A&H Motorsports & Acura reveal that the dash gauge indication probably is a wild goose chase and has no detrimental effect on my motor.
5) While I'm at it I may as well put in ACCURATE oil pressure and temp gauges as well. Now to find a place to mount them...
After yanking the entire #8 AN system out (it comes out far more quickly than it goes in) and running the rest of the BIR event with the oil filter back on the motor, I had the oil filter takeoff modified by Archer Racing to flow properly with #12 fittings installed.
Note the channel around the top of the takeoff had to be milled down .040 to allow the O-ring to compress enough to seal before the takeoff contacted the block. A little redesign is required on the original part.
Here's what all the pieces required to do the #12 system look like:
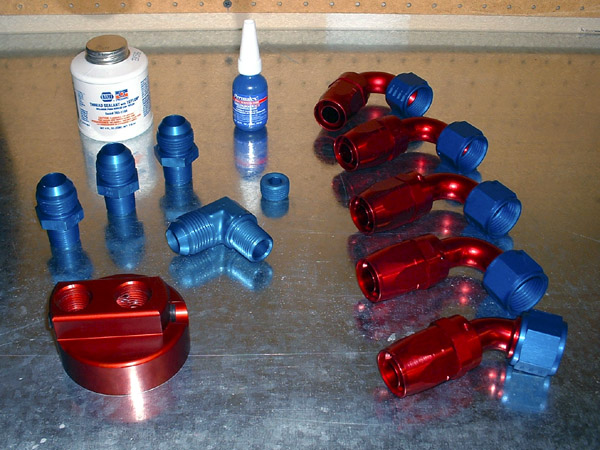
The NAPA Teflon thread sealant and Loctite were critical components here. Don't forget to pick some up! Setrab sent me the #12 fittings for the cooler for nothing. Thanks guys!
So starting up front, this is what we have:
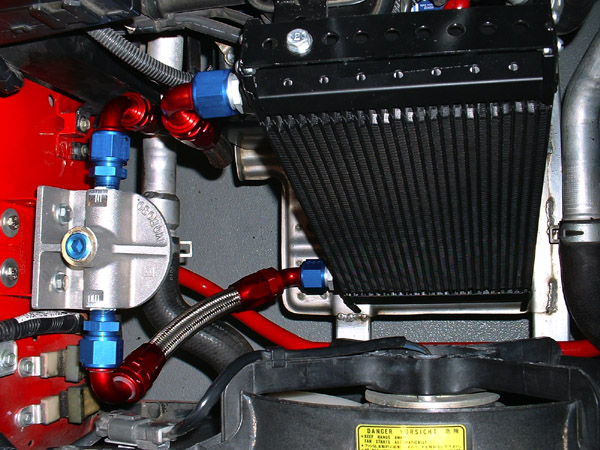
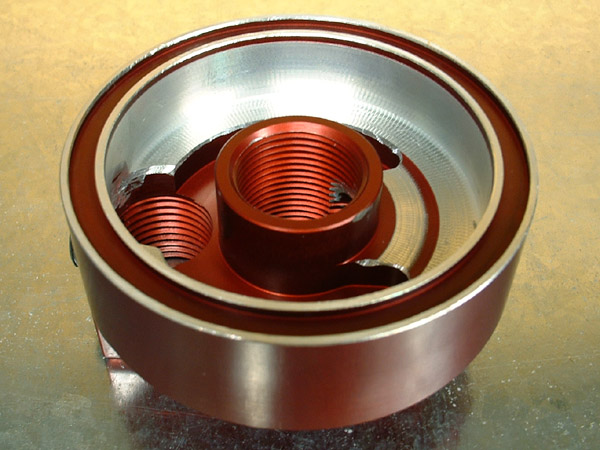
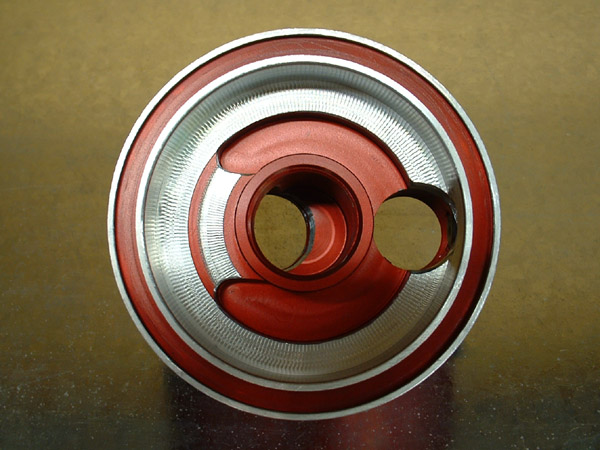
The Moroso remote oil filter mount has an in, out and a spare gauge/bypass fitting if you want to use it. Routing is as follows; From motor (outside fitting of takeoff) to remote filter in, filter out to bottom of oil cooler (to prevent trapped air in cooler element), top of cooler to motor oil in (center of takeoff). I'm using a size big Fram PH8A filter, and with the home made spacer, there's plenty of clearance to take it on and off.
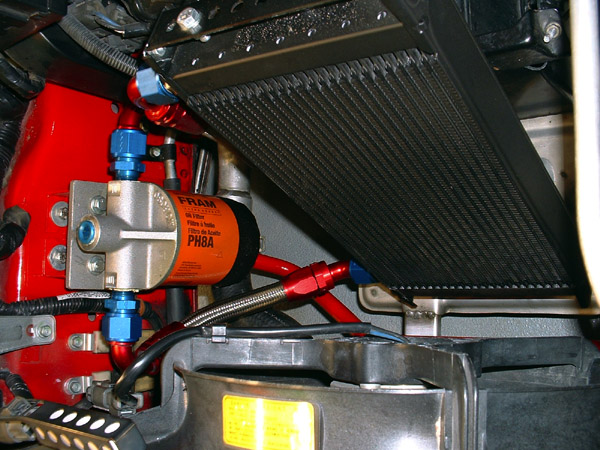
From the front bay to the motor is about 22' of hose round trip. I route the hose behind the battery box, through the center channel under the car, and to the motor beside the oil pan. There are plenty of places to tie wrap to keep it all secure and from touching anything. There isn't enough room to route the hose through all the little nooks with the fittings on, so I put the front fittings on, and ran the raw end to the motor, cut them to length and put the fittings on while laying on my back under the car. Just use tons of lube and it goes pretty easy. No comments here, smart ass.
At the motor is a different story.
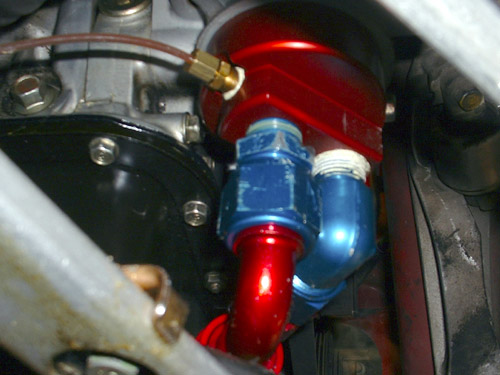
As there isn't enough room to put two #12 straight connectors next to each other, I had to put one 90 degree (right) and one straight fitting with a 90 on the hose. For hose routing that worked out better anyway. What didn't work out was the fact that when you assemble this, it has to be done in order because of how close everything is to the oil pan;
1) Oil O-ring and install takeoff on motor until tight (3/4 turn past first touch, just like a filter).
2) 90 degree #12 fitting. Teflon pipe sealant the pig and tighten. Of course, tight is pointing directly at the oil pan, so to keep it from leaking I had to go the other 3/4 turn tighter, which took an enormous amount of effort.
3) Straight #12 fitting. Here's the big issue, with the pan on one side and the 90 on the other, you can't get your 1-1/8" wrench in close enough to tighten the prick. You see the results of 10 (yes ten) take apart and put together events to get the thing situated where it wouldn't leak. Severe pain in the ass.
4) Install mechanical oil gauge sender fitting, with thread sealant. I put it on both sides (oil out and return) to get readings, and in doing so, allowed the plastic sender line to touch the axle. This was bad, as I had it crack while I was a mile from home and dumped 6 of my 7 quarts of oil on the ground at a stoplight. Have you ever seen your engine light FLASH before? I have. No damage though, thank God.
Of course this demands that these things be disassembled in the opposite order if you need to take this apart. Also, changing oil is a three step process; 1) drain the pan, 2) remove the bottom cooler fitting up front and drain that out, 3) replace the filter.
Last order of business, mount the gauges. Here's what I did;

This worked out slick! A little 3M double stick tape on the bottom of the mount, center it up and stick it to the strut brace and it's done. It clears the glass, and the gauges are very easily seen through the rear view mirror and don't block any rear visibility! Though it may seem "backwards", I can't tell you how well this works.
As for wiring, here's a little something I derived from the service manual: The engine bay fuse block has both constant and ignition switched (and fused) 12 VDC available! How nice of Acura to do that for us!
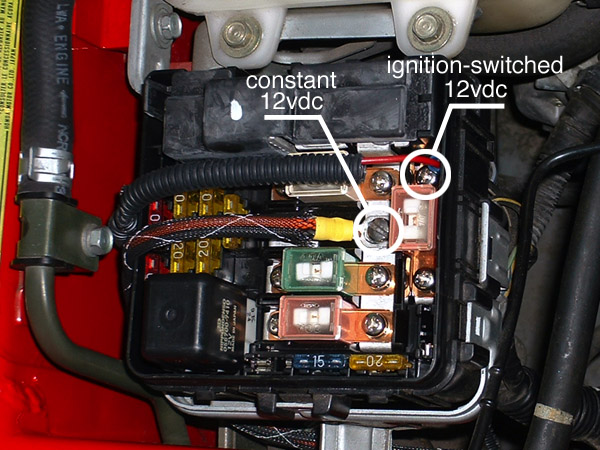
Be sure to add your own fuse when coming off the constant power. I'm running the N2O bottle warmer off the constant power so it can heat up while I'm not in the car (cheating bastard trick). I have the fuse and switch in the trunk. I'm running the lights for the two gauges off the fused side of the 30A Ignition fuse, which comes active when the key is at the 2nd click. If you running anything with a high current draw, you may want to come off the pre-fused side (closest to air filter) and add your own fuse.
Thanks to the new temp gauge, I know my oil is at 180 degrees F while just driving around. I'll have it to the track on the 29th of May so I'll have some numbers on how hot it gets at 8000 rpm on the juice. I'll finally get to see what the oil cooler is up to!
That's most of the installation. I'm also making a cover for the gauge backs so they can't be seen through the glass. I may market this!
So what did I learn? Here's the poop on the NSX oil system as I know it;
Let's start with the requirements for the car. There should be no less than 10lbs of pressure at the crank for every 1000 RPM (Stock motor should be close to 100 psi). So at 8k RPM there should be 80+psi of oil. Around 75 psi is where the oil pressure regulator is set, so the pump MUST produce at least 75psi before the relieve valve even thinks about doing anything. The factory gauge is very inaccurate, and only tells you about relative oil pressure changes in the VTEC galley at the top of the motor, not at the crank.
My car makes 95psi at the motor (oil filter "out" side). The remote filter/cooler kit I put in w/#12 AN lines and the huge 9x12 cooler causes about 15psi of drop, leaving me with no less than 80psi at the crank (oil filter "in" side), which is fine. I can boost that pressure a bit by replacing my old relief valve spring with a fresh one and adding a .040 shim between the spring and the valve (I picked one up from RealTime Racing, just to have for a rainy day). Having the front mounted cooler is not the most desirable as the length of tubing and resultant drop in psi taxes the oil pump. Closer rear or passenger side mounting of an oil-air or oil-water unit using #12 lines would be best.
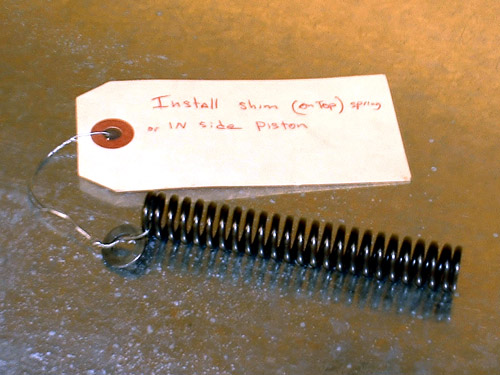
Higher HP (400+) could cause the thin layer of oil I have at 80psi to squeeze out. I can up the pressure with the new spring and shim, making sure not to exceed 100psi at the crank. Apparently these springs lose there spring over time with heat and fatigue and should be replaced. The shim is good for about 5 psi. See page 8-6 of the NSX Service Manual for more info.
So my situation was this; at high RPM the factory gauge starts to drop off from 3.5 bars to 2 to 1 etc. which should tell me that the oil pressure at the cams is dropping - well below the pressure required to keep it in VTEC - but my car never drops out of VTEC. While the dash gauge drops, the Auto Meter mechanical gauge stays rock solid at 82psi, which is good. My pump is doing it's job, the oil is cool, but the factory gauge is indicating low pressure at high RPM. That's the heart of this situation.
There was a service bulletin for factory gauges that read "too low" at idle that replaced the sender or the gauge or both depending on your VIN. This may be related to my situation, but isn't the cause.
Result? It very possible and likely that my factory gauge/sender are not working correctly and I've been chasing a ghost. If the oil pressure at the cams was low, I would drop out of VTEC and/or seize up my bearingless cams "tight as a 12 year old" as my dad would say. I have done neither, so there must be enough pressure to keep things going. The only other possibility is a slight blockage of the head oil control orifice that allows oil to leave the head faster than it can come in (I'm not sure of this one) but that would absolutely cause it to drop out of VTEC.
What do I have now? A usable oil cooler system, more oil, a real oil pressure gauge and about $1100 in receipts and 20 hours of time in. Doing the service bulletin update would cost $350+ for parts and probably the same amount in labor, and may not show me any better info than the one I have.
I'll leave the setup I have now and see how it acts. Maybe this winter if I get a wild hair I'll rig the passenger side unit and see how that effects things.
PD Cunningham's car uses an oil-water system mounted in the trunk. Crank oil pressure is 100 psi and after the cooler its 95 psi. It works so well that it cools the oil too much, so they have a proportioning valve to flow hot oil around it. They use #12 oil lines exclusively.
That's the bulk of it. Lots of reading I know, but with any luck, you can learn from my mistakes and misdirection. That's why I'm here!